iPhone 12 mini Screen Replacement

Go to step 1

If your iPhone 12 mini screen is cracked, not responding to touch, or not showing a picture when your phone is powered on, use this guide to restore your iPhone to working order with a new screen, a.k.a. display assembly.

The combined earpiece speaker + sensor assembly affixed to the back of the display is paired to your individual iPhone from the factory, so you must transfer it from your old display to your new one during any display replacement. It contains the flood illuminator, which is part of the biometric Face ID security feature. If it is damaged or replaced, Face ID will cease to function, so take extra care not to damage any of these components during this procedure. If damaged, only Apple or an Apple-authorized technician can restore Face ID function.

Note: True Tone functionality is disabled after a screen replacement, even when using an original Apple screen. Additionally, your iPhone may temporarily show a warning about the “genuineness” of the display.

You’ll need replacement adhesive to reattach components when reassembling the device.

For wholesale purchases,please contact WhatsApp:+86-18923771260 email: [email protected]

    • Before you begin, discharge your iPhone battery below 25%. A charged lithium-ion battery can catch fire and/or explode if accidentally punctured.

    • Power off your iPhone before beginning disassembly.

    • Remove the two 6.7 mm-long pentalobe screws at the bottom edge of the iPhone.

  1. iPhone 12 mini Screen Replacement, Mark your opening picks: step 2, image 1 of 3 iPhone 12 mini Screen Replacement, Mark your opening picks: step 2, image 2 of 3 iPhone 12 mini Screen Replacement, Mark your opening picks: step 2, image 3 of 3
    • If inserted too far, an opening pick can damage your device. Follow this step to mark your pick and prevent damage.

    • Measure 3 mm from the tip and mark the opening pick with a permanent marker.

    • You can also mark the other corners of the pick with different measurements.

    • Alternatively, tape a coin to a pick 3 mm from the tip.

  2. iPhone 12 mini Screen Replacement, Tape over any cracks: step 3, image 1 of 3 iPhone 12 mini Screen Replacement, Tape over any cracks: step 3, image 2 of 3 iPhone 12 mini Screen Replacement, Tape over any cracks: step 3, image 3 of 3
    • If your iPhone has a cracked screen, keep further breakage contained and prevent bodily harm during your repair by taping over the glass.

    • Lay overlapping strips of clear packing tape over the iPhone's screen until the whole face is covered.

    • Wear safety glasses to protect your eyes from any glass shaken free during the repair.

    • If you can't get the suction cup to stick in the next few steps, fold a strong piece of tape (such as duct tape) into a handle and lift the screen with that instead.

    • If all else fails, you can superglue the suction cup to the screen.

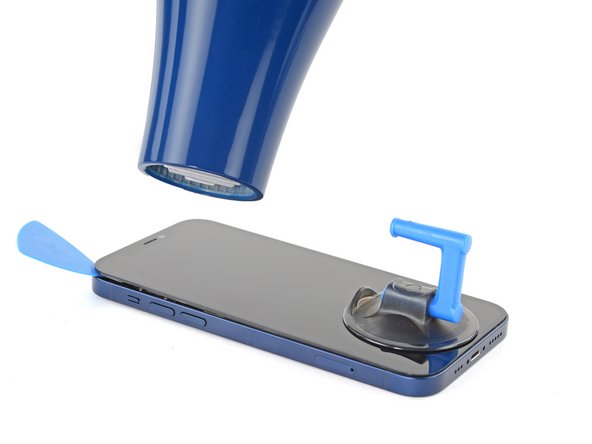
  3. iPhone 12 mini Screen Replacement, Heat the bottom edge of the phone: step 7, image 1 of 1
    • Opening the iPhone's display will compromise its waterproof seals. Have replacement seals ready before you proceed past this step, or take care to avoid liquid exposure if you reassemble your iPhone without replacing the seals.

    • Heating the bottom edge of the iPhone helps soften the adhesive securing the display, making it easier to open.

    • Use a hair dryer or a heat gun to heat the bottom edge of the iPhone for 90 seconds or until the screen is slightly too hot to touch.

    • Never leave your hair dryer in one spot for an extended period of time.

    • If you have trouble during the opening procedure, the adhesive most likely cooled down. Apply more heat to further soften the adhesive.

  4. iPhone 12 mini Screen Replacement, Apply a suction handle: step 8, image 1 of 2 iPhone 12 mini Screen Replacement, Apply a suction handle: step 8, image 2 of 2
    • If you're using a single suction handle, apply it to the bottom edge of the phone, as close to the edge as possible.

    • If your display is badly cracked, covering it with a layer of clear packing tape may allow the suction cup to adhere. Alternatively, very strong tape may be used instead of the suction cup. If all else fails, you can superglue the suction cup to the broken screen.

  5. iPhone 12 mini Screen Replacement, Lift the screen slightly: step 9, image 1 of 3 iPhone 12 mini Screen Replacement, Lift the screen slightly: step 9, image 2 of 3 iPhone 12 mini Screen Replacement, Lift the screen slightly: step 9, image 3 of 3
    • Pull up on the suction cup with firm, constant pressure to create a slight gap between the screen and the frame.

    • Insert an opening pick into the gap under the screen's plastic bezel.

    • The watertight adhesive holding the screen in place is very strong; creating this initial gap takes a significant amount of force. If you're having a hard time opening a gap, apply more heat, and gently rock the screen up and down to weaken the adhesive until you create enough of a gap to insert your tool.

  6. iPhone 12 mini Screen Replacement, Heat the right edge: step 10, image 1 of 2 iPhone 12 mini Screen Replacement, Heat the right edge: step 10, image 2 of 2
    • Use a hair dryer to heat the right edge of the iPhone (the edge with the power button) for 90 seconds or until the screen is slightly too hot to touch.

  7. iPhone 12 mini Screen Replacement, Separate the screen adhesive: step 11, image 1 of 3 iPhone 12 mini Screen Replacement, Separate the screen adhesive: step 11, image 2 of 3 iPhone 12 mini Screen Replacement, Separate the screen adhesive: step 11, image 3 of 3
    • Slide the opening pick around the bottom right corner and along the right edge of the iPhone, slicing through the adhesive holding the display in place.

    • Don't insert your pick more than 3 mm, as you may damage internal components.

  8. iPhone 12 mini Screen Replacement, Heat the top edge: step 12, image 1 of 1
    • Use a hair dryer to heat the top edge of the iPhone for 90 seconds or until the screen is slightly too hot to touch.

  9. iPhone 12 mini Screen Replacement: step 13, image 1 of 3 iPhone 12 mini Screen Replacement: step 13, image 2 of 3 iPhone 12 mini Screen Replacement: step 13, image 3 of 3
    • The top edge of the display is secured with both glue and clips.

    • Insert your pick underneath the top-right corner of the display panel.

    • Slide the pick around the top right corner. Because of the clips you might encounter some resistance.

    • Don't insert your pick more than 3 mm, as you may damage the front panel sensor array.

    • Gently pulling the front panel assembly towards the bottom edge of the phone simplifies this step a little.

    • Slide the pick along the top edge and cut any remaining adhesive securing the display.

  10. iPhone 12 mini Screen Replacement, Heat the left edge: step 14, image 1 of 2 iPhone 12 mini Screen Replacement, Heat the left edge: step 14, image 2 of 2
    • Use a hair dryer to heat the left edge of the iPhone for 90 seconds or until the screen is slightly too hot to touch.

  11. iPhone 12 mini Screen Replacement, Screen information: step 15, image 1 of 1
    • There's a delicate cable along the left edge of your iPhone. Don't insert your pick here, as you may damage the cable.

  12. iPhone 12 mini Screen Replacement, Separate the left adhesive: step 16, image 1 of 2 iPhone 12 mini Screen Replacement, Separate the left adhesive: step 16, image 2 of 2
    • Insert a second opening pick in the bottom left corner of the iPhone.

    • Twist both picks simultaneously until the left edge clips release.

    • Apply the twisting force gradually.

    • If you're having trouble separating the adhesive, reheat the left edge.

  13. iPhone 12 mini Screen Replacement, Open the iPhone: step 17, image 1 of 3 iPhone 12 mini Screen Replacement, Open the iPhone: step 17, image 2 of 3 iPhone 12 mini Screen Replacement, Open the iPhone: step 17, image 3 of 3
    • Rotate your iPhone so the right edge faces you.

    • Open the iPhone by swinging the display up from the right side, like the front cover of a book.

    • Don't try to fully separate the display yet, as several fragile ribbon cables still connect it to the iPhone's logic board.

    • Lean the display against something to keep it propped up while you're working on the phone.

    • During reassembly, lay the display in position, align the clips along the top edge, and carefully press the top edge into place before snapping the rest of the display down. If it doesn't click easily into place, check the condition of the clips around the perimeter of the display and make sure they aren't bent.

  14. iPhone 12 mini Screen Replacement, Unscrew the battery and display connector cover: step 18, image 1 of 2 iPhone 12 mini Screen Replacement, Unscrew the battery and display connector cover: step 18, image 2 of 2
    • Remove the 1.25 mm-long Y000 screw securing the battery & display connector cover bracket.

    • Throughout this repair, keep track of each screw and make sure it goes back exactly where it came from to avoid damaging your iPhone.

    • During reassembly, this is a good point to power on your iPhone and test all functions before you seal the display in place. Be sure to power your iPhone back down completely before you continue working.

  15. iPhone 12 mini Screen Replacement, Remove the battery and display connector cover: step 19, image 1 of 2 iPhone 12 mini Screen Replacement, Remove the battery and display connector cover: step 19, image 2 of 2
    • Use a pair of tweezers to remove the battery & display connector bracket.

    • There are two little hinges on the right edge of the connector bracket. Make sure to align them with their counterparts during reassembly.

  16. iPhone 12 mini Screen Replacement, Disconnect the battery: step 20, image 1 of 2 iPhone 12 mini Screen Replacement, Disconnect the battery: step 20, image 2 of 2
    • Use a spudger or a clean fingernail to pry the battery connector up from its socket on the logic board.

    • Try not to damage the black silicone seal surrounding this and other board connections. These seals provide extra protection against water and dust intrusion.

    • Bend the connector slightly away from the logic board to prevent it from accidentally making contact with the socket and providing power to the phone during your repair.

  17. iPhone 12 mini Screen Replacement, Disconnect the OLED display cable: step 21, image 1 of 2 iPhone 12 mini Screen Replacement, Disconnect the OLED display cable: step 21, image 2 of 2
    • Use a spudger or a clean fingernail to pry the OLED panel cable connector up from its socket on the logic board.

    • To re-attach press connectors like this one, carefully align and press down on one side until it clicks into place, then repeat on the other side. Do not press down on the middle. If the connector is misaligned, the pins can bend, causing permanent damage.

  18. iPhone 12 mini Screen Replacement, Unscrew the front sensor assembly cover: step 22, image 1 of 2 iPhone 12 mini Screen Replacement, Unscrew the front sensor assembly cover: step 22, image 2 of 2
    • Remove the five 1 mm-long Y000 screws securing the front sensor assembly cover bracket.

  19. iPhone 12 mini Screen Replacement: step 23, image 1 of 2 iPhone 12 mini Screen Replacement: step 23, image 2 of 2
    • Use a pair of tweezers to remove the front sensor assembly bracket.

  20. iPhone 12 mini Screen Replacement, Disconnect the front sensors: step 24, image 1 of 2 iPhone 12 mini Screen Replacement, Disconnect the front sensors: step 24, image 2 of 2
    • Use a spudger or a clean fingernail to disconnect the front sensor assembly cable connector.

  21. iPhone 12 mini Screen Replacement, Remove the display assembly: step 25, image 1 of 1
  22. iPhone 12 mini Screen Replacement, Unscrew the front sensor and speaker assembly: step 26, image 1 of 2 iPhone 12 mini Screen Replacement, Unscrew the front sensor and speaker assembly: step 26, image 2 of 2
    • Remove the 1.1 mm-long tri-point Y000 screw.

    • Remove the 1.8 mm-long tri-point Y000 screw.

    • Remove the two 1.6 mm-long Phillips #00 screws.

    • Don't try to remove the front sensor and speaker assembly yet. It's still glued to the rear side of the display panel.

  23. iPhone 12 mini Screen Replacement: step 27, image 1 of 2 iPhone 12 mini Screen Replacement: step 27, image 2 of 2
    • Slide the flat end of a spudger underneath the top right corner of the earpiece speaker and fold it to the back.

  24. iPhone 12 mini Screen Replacement, Heat up the top edge of the display: step 28, image 1 of 1
    • Use a hairdryer or heat gun or prepare an iOpener and apply it to the top front of the display for 1-2 minutes, in order to soften the adhesive securing the sensors.

  25. iPhone 12 mini Screen Replacement, Pry up the proximity sensor: step 29, image 1 of 2 iPhone 12 mini Screen Replacement, Pry up the proximity sensor: step 29, image 2 of 2
    • Use the pointed end of a spudger to carefully pry the proximity sensor out of its recess.

  26. iPhone 12 mini Screen Replacement: step 30, image 1 of 2 iPhone 12 mini Screen Replacement: step 30, image 2 of 2
    • Slide a spudger underneath the wide sensor assembly flex cable to separate it from the screen.

    • Avoid tensioning any of the sensor flex cables during this procedure.

  27. iPhone 12 mini Screen Replacement, Pry up the flood illuminator: step 31, image 1 of 2 iPhone 12 mini Screen Replacement, Pry up the flood illuminator: step 31, image 2 of 2
    • Use a spudger or a pair of tweezers to pry the flood illuminator out of its recess.

  28. iPhone 12 mini Screen Replacement, Remove the earpiece speaker and front sensor assembly: step 32, image 1 of 3 iPhone 12 mini Screen Replacement, Remove the earpiece speaker and front sensor assembly: step 32, image 2 of 3 iPhone 12 mini Screen Replacement, Remove the earpiece speaker and front sensor assembly: step 32, image 3 of 3
    • Remove the earpiece speaker and front sensor assembly.

    • During reassembly, check the position of the sensors and the microphone. Avoid obstructing them with any adhesive.

    • Flood illuminiator

    • Proximity sensor

    • Microphone