iPhone 8 Screen Replacement
Go to step 1Learn how to replace your iPhone's screen. Use this guide to replace the screen assembly with the front-facing camera, earpiece speaker, and EMI shield already installed for easier repair.
You will simply remove the old display and transfer the original home button/Touch ID sensor from the old display assembly to the new one.
Regardless, make sure you transfer the old home button assembly to the new display assembly. The original home button/Touch ID sensor must be transferred to the new display assembly in order for Touch ID to work properly.
Note : If your phone's automatic screen brightness adjustment function fails after repair, please make sure your phone is updated to iOS 12. Even if you use original Apple accessories, the True Tone function will not work.
For wholesale purchases,please contact WhatsApp:+86-18923771260 email: [email protected]
-
-
-
If your screen glass is cracked, you can use some packing tape to cover the entire screen to prevent injury from broken glass.
-
Cover the entire face of the iPhone with tape and extend the tape until the entire display is covered.
-
If the shattered glass makes it difficult to get the suction cup to stick in the next few steps, try using a strong adhesive tape such as duct tape and lift the display with that.
-
-
-
Heating the lower edge of the iPhone will help soften the adhesive securing the display, making it easier to open.
-
Use a hairdryer or prepare an iOpener and apply it to the lower edge of the phone for about 90 seconds in order to soften the adhesive underneath.
-
-
-
Apply a suction cup to the lower half of the front panel, just above the home button.
-
-
-
Pull up on the suction cup with firm, constant pressure to create a slight gap between the screen and frame.
-
Insert an opening pick into the gap.
-
-
-
Slide the opening pick up the left edge of the phone starting at the bottom edge and moving toward the volume control buttons and silent switch, breaking up the adhesive securing the display.
-
Stop near the upper left corner of the display.
-
-
-
-
Re-insert your tool at the lower right corner of the iPhone, and slide it up the right edge of the phone to separate the adhesive.
-
-
-
Gently pull up on the suction cup to lift up the bottom edge of the display.
-
Pull up on the small nub on the suction cup to remove it from the front panel.
-
-
-
Starting at the top left corner below the display, slide an opening pick along the top edge of the phone to loosen the last of the adhesive.
-
-
-
Slide the display assembly slightly downward (away from the top edge of the phone) to disengage the plastic clips holding it to the rear case.
-
-
-
Open the phone by gently swinging the display open from the left side, like the back cover of a book.
-
Lean the display against something to keep it propped up while you're working on the phone.
-
-
-
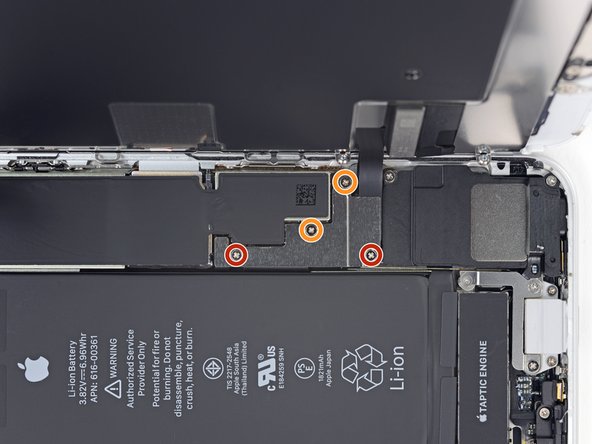
Remove the four Phillips screws securing the display electronics bracket to the circuit board as follows:
-
Two 1.3 mm screws
-
Two 2.8 mm screws
-
Remove the bracket.
-
-
-
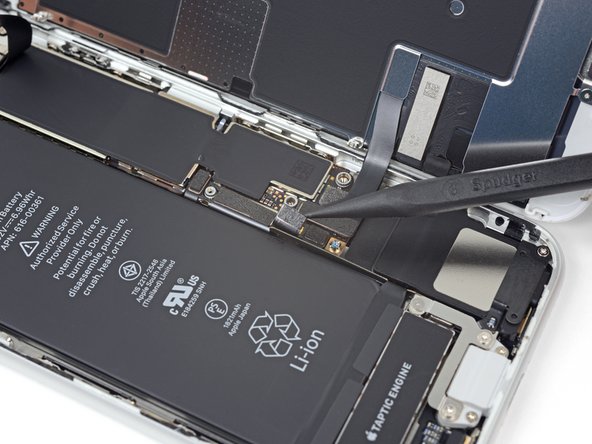
Use the point of a spudger to pry the battery connector connector up from its socket on the logic board.
-
Bend the battery connector slightly away from the logic board to prevent it from accidentally making contact with the socket and providing power to the phone during your repair.
-
-
-
Use the point of a spudger to gently pry the first lower display connector up off its socket.
-
-
-
Use the point of a spudger to disconnect the second display cable connector underneath the display.
-
-
-
Remove the three 1.3 mm Phillips screws securing the bracket over the front panel sensor assembly connector.
-
Remove the bracket.
-
-
-
Remove the four Tri-point screws securing the home button / Touch ID sensor bracket.
-
One 1.2 mm screw
-
Three 1.3 mm screws
-
Remove the bracket.
-
-
-
Use a spudger to pry up on the left side of the home button cable connector to disconnect it.
-
-
-
Flip the display assembly over. Use a hairdryer or prepare an iOpener and heat the lower edge of the display for about 90 seconds in order to soften the adhesive underneath.
-
-
-
Use an opening pick to gently push up on the adhesive holding the home button / Touch ID sensor cable together and separate it from the back of the display assembly.
-


